think-queue 的安装配置及使用
think-queue 是 ThinkPHP 下的一款任务队列支持组件,这次使用主要用于在项目里承担消息发送及相关操作事件的回调操作。
安装
目前 ThinkPHP 基本都是使用 composer 来管理组件包,所以安装也是使用 composer 进行。
composer require topthink/think-queue配置
安装好之后,会在 conifg 目录下生成一个 queue.php 配置文件。
目前支持三种队列数据储存方式:
| 方式 | 说明 |
|---|---|
| sync | 同步执行,有新队列任务则通过 ThinkPHP 的事件 Event 来直接触发执行 |
| database | 数据库存储,新队列任务数据存储到数据库,队列执行程序再从数据库中读取任务数据 |
| redis | Redis 存储,新队列任务数据存储到 Redis,队列执行程序再从 Redis 中读取任务数据 |
<?php
return [
    // 默认连接
    'default'     => 'sync',
    // 连接配置
    'connections' => [
        // 同步执行
        'sync'     => [
            // 连接方式
            'type' => 'sync',
        ],
        // 数据库
        'database' => [
            'type'       => 'database',
            // 队列名
            'queue'      => 'default',
            // 表名
            'table'      => 'jobs',
            // 数据连接配置(database.connections)
            'connection' => null,
        ],
        // Redis
        'redis'    => [
            'type'       => 'redis',
            'queue'      => 'default',
            // 服务器IP
            'host'       => '127.0.0.1',
            // 服务器端口
            'port'       => 6379,
            // 认证密码
            'password'   => '',
            // 数据库
            'select'     => 0,
            // 超时时间(0代表不限制)
            'timeout'    => 0,
            // 持久化
            'persistent' => false,
        ],
    ],
    // 失败队列任务记录
    'failed'      => [
        // 记录方式:none=不记录,database=记录在数据库
        'type'  => 'none',
        // 数据库表名
        'table' => 'failed_jobs',
    ],
];
数据库初始化
使用脚本
如果是选择数据库作为队列任务数据储存方式,那边需要创建对应的表。think-queue 是使用 think-migration 来创建数据库表的,所以需要先安装 think-migration。
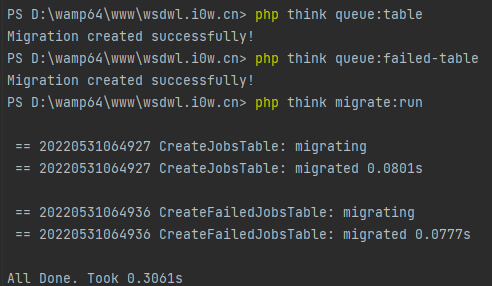
composer require topthink/think-migration然后再使用这三条命令来完成表创建
php think queue:table
php think queue:failed-table
php think migrate:run 
初始化完毕之后,删除 think-migration,因为后续使用用不上了。
composer remove topthink/think-migration同时,清理残余文件和表。删除项目下的 database 目录,删除数据库中的 migrations 表。
自行创建表
当然,think-migration 也是直接写入表,只是能兼容多种数据库类型。
如果你是用 MySQL,且懒得用命令执行数据库初始化的话,可以直接使用下面的语句来创建表。
CREATE TABLE `jobs` (
  `id` int NOT NULL AUTO_INCREMENT,
  `queue` varchar(255) NOT NULL,
  `payload` longtext NOT NULL,
  `attempts` tinyint unsigned NOT NULL,
  `reserve_time` int unsigned DEFAULT NULL,
  `available_time` int unsigned NOT NULL,
  `create_time` int unsigned NOT NULL,
  PRIMARY KEY (`id`),
  KEY `queue` (`queue`)
) ENGINE=InnoDB DEFAULT CHARSET=utf8mb3;
CREATE TABLE `failed_jobs` (
`id` int NOT NULL AUTO_INCREMENT,
`connection` text NOT NULL,
`queue` text NOT NULL,
`payload` longtext NOT NULL,
`exception` longtext NOT NULL,
`fail_time` timestamp NOT NULL DEFAULT CURRENT_TIMESTAMP,
PRIMARY KEY (`id`)
) ENGINE=InnoDB DEFAULT CHARSET=utf8mb3;创建任务类
任务类不需继承任何类,如果这个类只有一个任务,那么就只需要提供一个 fire 方法就可以了,如果有多个小任务,就写多个方法,下面发布任务的时候会有区别。
每个方法会传入 $job 和 $data参数。还有个可选的任务失败执行的方法 failed 传入的参数为 $data。
简单的邮件发送任务类:
<?php

namespace app\job;

use think\queue\Job;

/**
 * 发送邮件通知
 */
class Mail
{
    /**
     * 默认任务
     * @param Job   $job  当前任务
     * @param mixed $data 任务数据
     */
    public function fire(Job $job, $data)
    {
        // 发送邮件
        $ret = mail($data['to'], $data['subject'], $data['message']);

        // 发送成功,删除当前任务。如果不删除,会重新执行任务!!!
        if (true === $ret) {
            $job->delete();
            return;
        }

        // 如果重试发送超过3次都没成功,那就记录错误一条日志
        if ($job->attempts() > 3) {
            error_log('邮件发送失败');
            return;
        }

        // 当然,如果测试时间不想因为失败而导致删除任务,可以重新发布任务
        $job->release(5);
    }

    /**
     * 任务1
     * @param Job   $job  当前任务
     * @param mixed $data 任务数据
     */
    public function one(Job $job, $data)
    {
    }

    /**
     * 任务失败
     * @param array $data 任务数据
     * @param \Exception $e 异常
     */
    public function failed($data, $e)
    {
        // 可以在这里记录失败日志
    }
}
发布任务
$job = \app\job\Mail::class;
$data = [
    'to' => '86849180@qq.com',
    'subject' => '测试邮件',
    'message' => '门前,大桥下,游来一群鸭~~'
];
// 方式一:推送任务到队列,并立即执行
\think\facade\Queue::push($job, $data = '');

// 方式二:推送任务到队列,5 秒后执行
\think\facade\Queue::later(5, $job, $data);

// 方式三:推送任务1到队列,并立即执行
\think\facade\Queue::push($job . '@one', $data);
监听和执行任务
在终端执行
php think queue:work调试完毕后,可以使用 Supervisor 来保持队列的进程常驻。
参考配置:
[program:queue-work]
command=php think queue:work
directory=/www/wwwroot/wsdzhwl/
user=www
priority=999
numprocs=1
可能遇到的问题
1.The migration class name "CreateJobsTable" already exists
这是之前运行过 php think queue:table,需要删除下 database/migrations
[InvalidArgumentException]
The migration class name "CreateJobsTable" already exists

结语
到此结束,有什么不对的地方,欢迎评论交流。
最后的最后,还有一个福利。开发者们,欢迎您加入腾云先锋(TDP)反馈交流群,群内有丰富的活动可收获积分和成长值,兑换惊喜福利。加入方式:https://cloud.tencent.com/developer/article/1855195
我们是腾云先锋(TDP)团队,是腾讯云GTS官方组建并运营的技术开发者群体。里有最专业的开发者&客户,能与产品人员亲密接触,专有的问题&需求反馈渠道,有一群志同道合的兄弟姐妹,期待您的加入!